Need help with our new registration system? This page will walk you through the process step by step. To get started, you’ll need to set up an account or log in to your imported account. Click the button below that best describes you.
New Users: Create an Account
If you have never attended the MVC, have not attended recently (between the years of 2022 and 2025), and/or are not an OVMA member, you will first need to create an account.
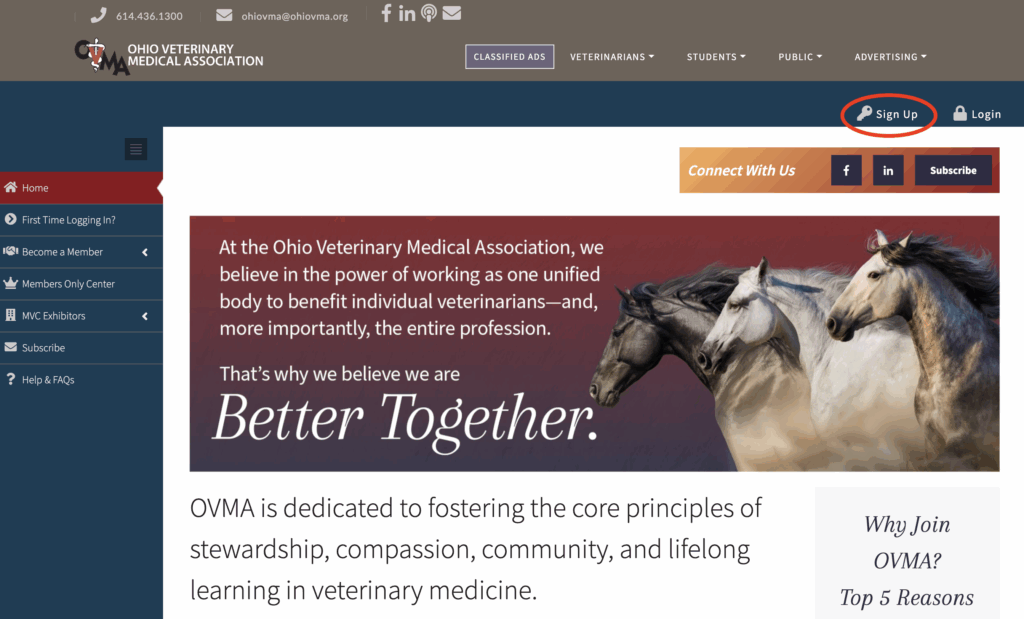
1. Click here to go to the MVC registration system (link will open in a new tab) and click “Sign Up.”
2. Provide the information required on each page.
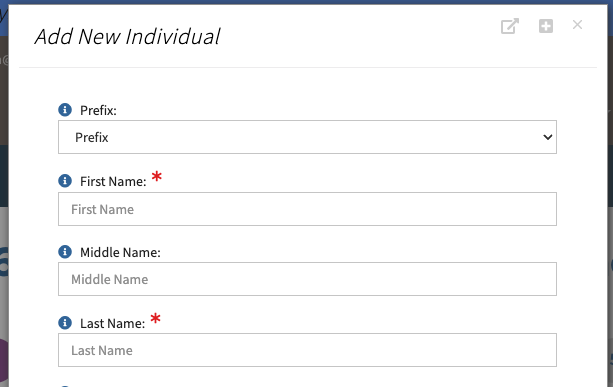
Page 1: Enter your name, title, email address, and password.* Click “Create Account.”
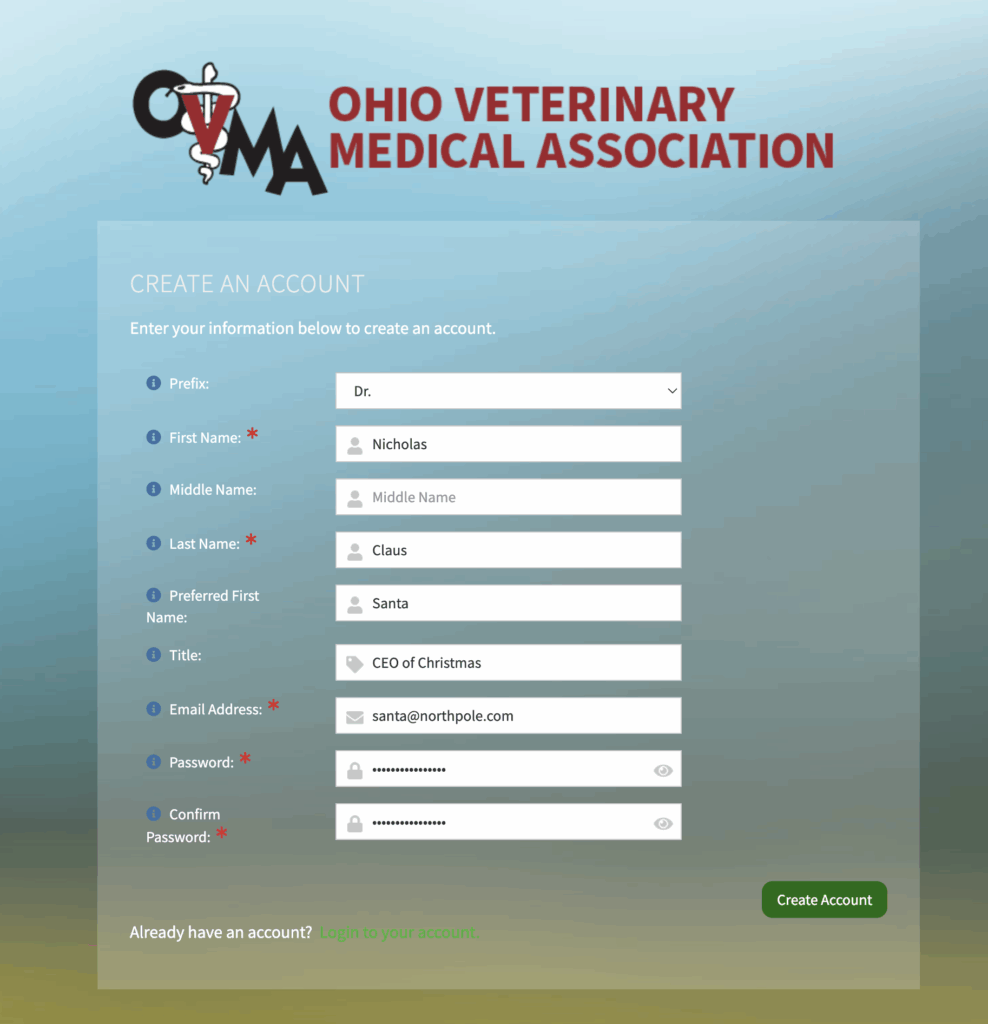
*Please note, our system requires a 16-character password that contains a combination of letters, numbers, and symbols. Need help? Try a password generator »
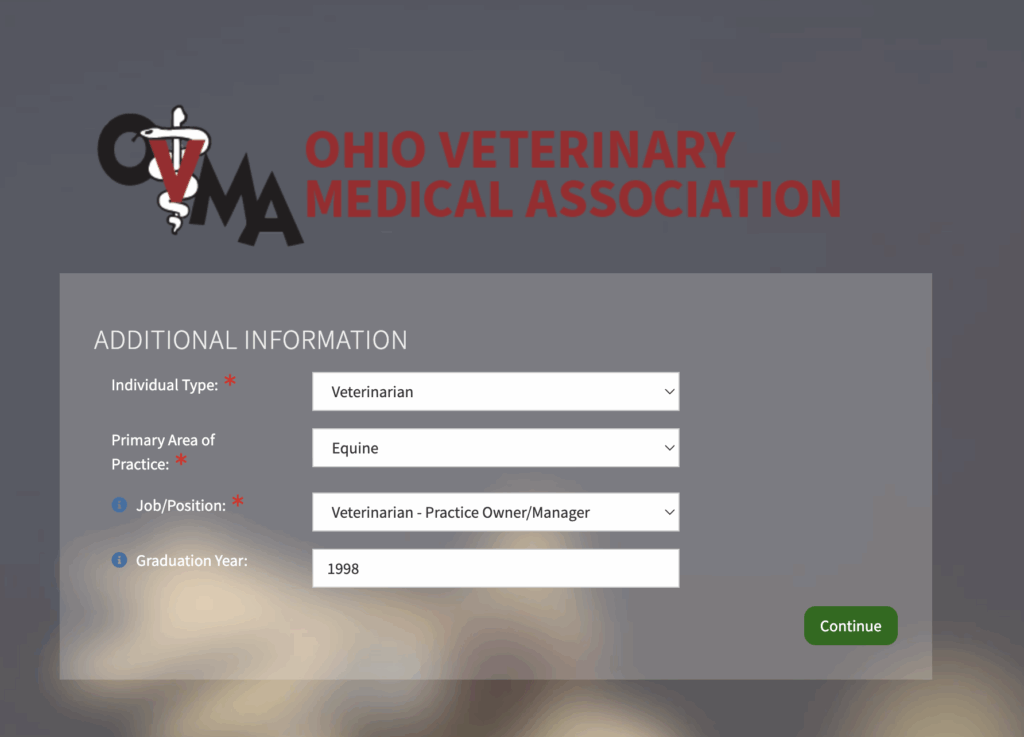
Page 2: Select your individual type, area of practice, the job/position that best fits your role, and (if you are a vet or vet student) your graduation year. Click “Continue.”
Page 3: Type your company name in the search box and click “Continue.” On the next page, select your company.** You can check the boxes below to add your company’s address and/or phone number as your work address and phone number. Click “Continue.”
If you do not want to be linked to an organization or do not have one, click “Skip.”
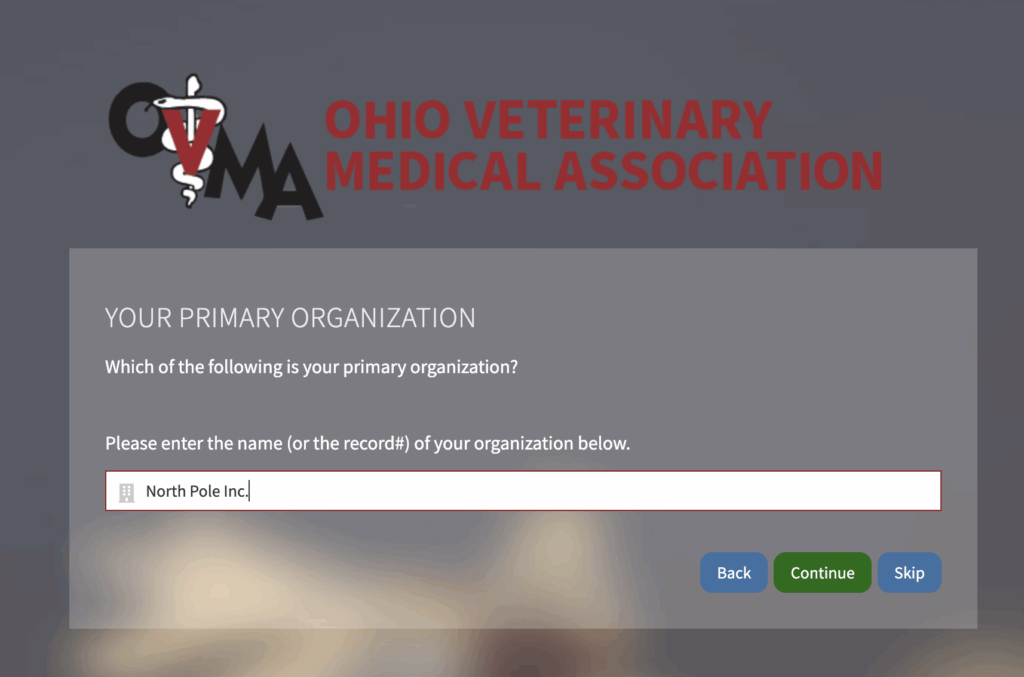
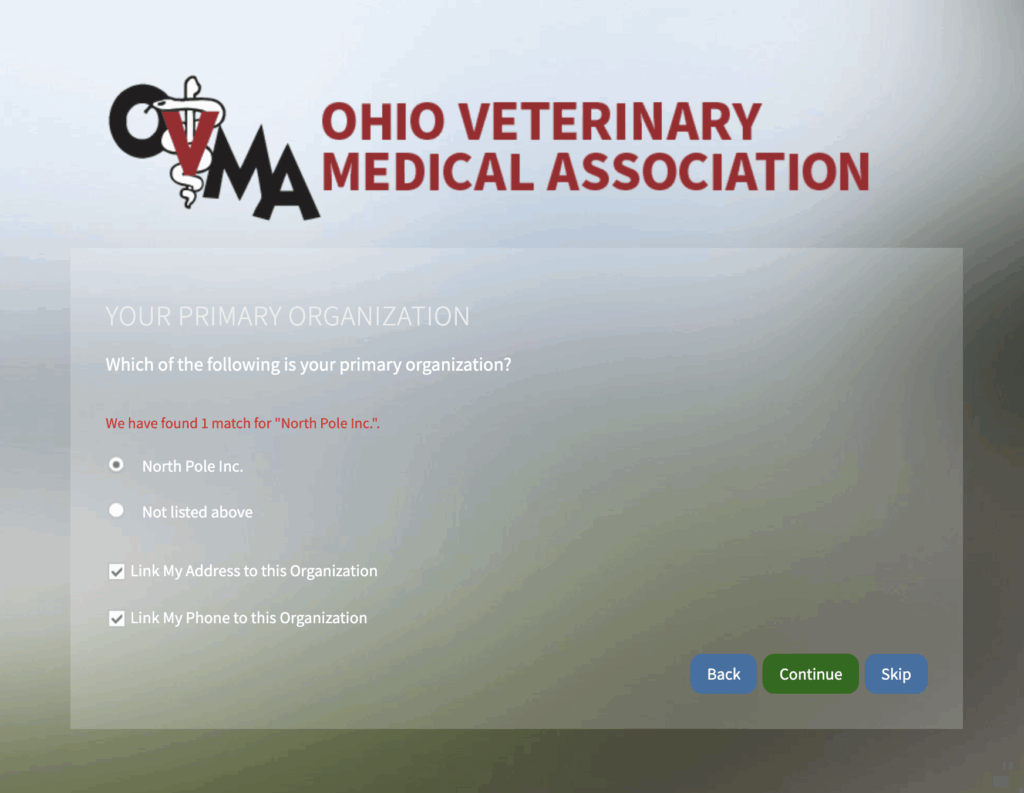
**If your company is not listed, you can contact OVMA to have it added. In the mean time, click “Skip” to continue with the account creation process.
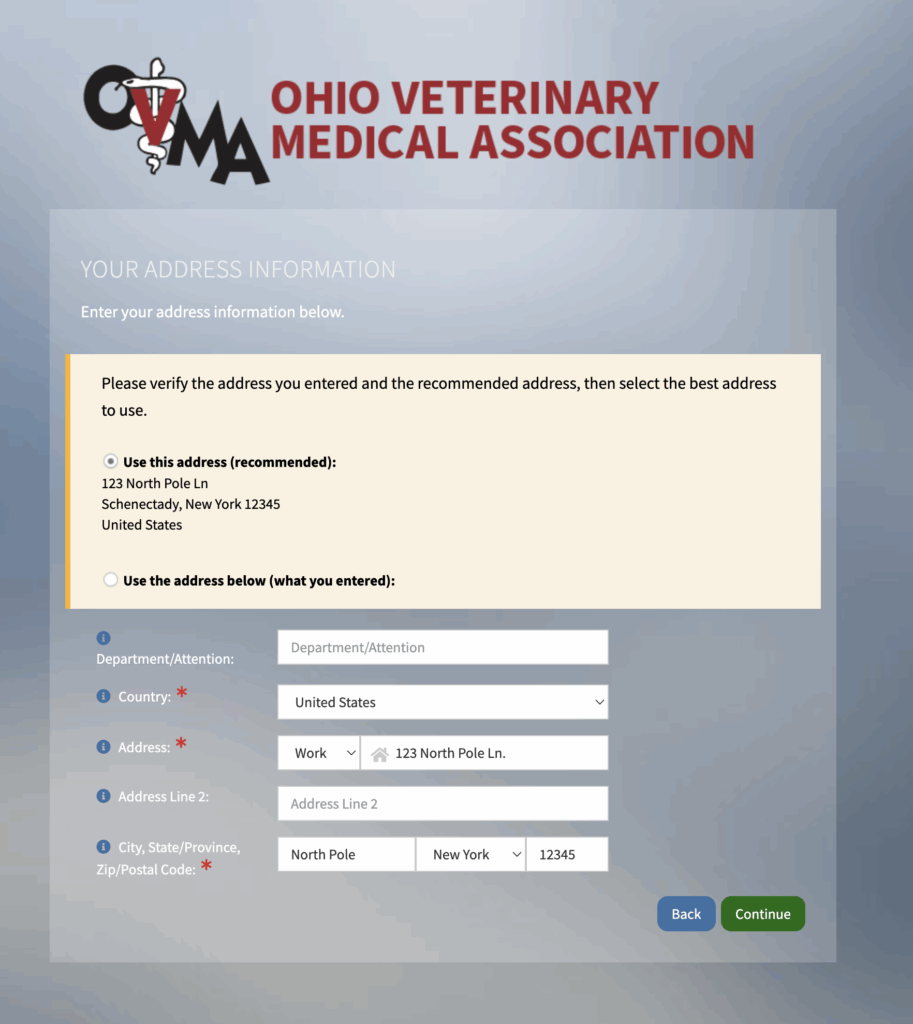
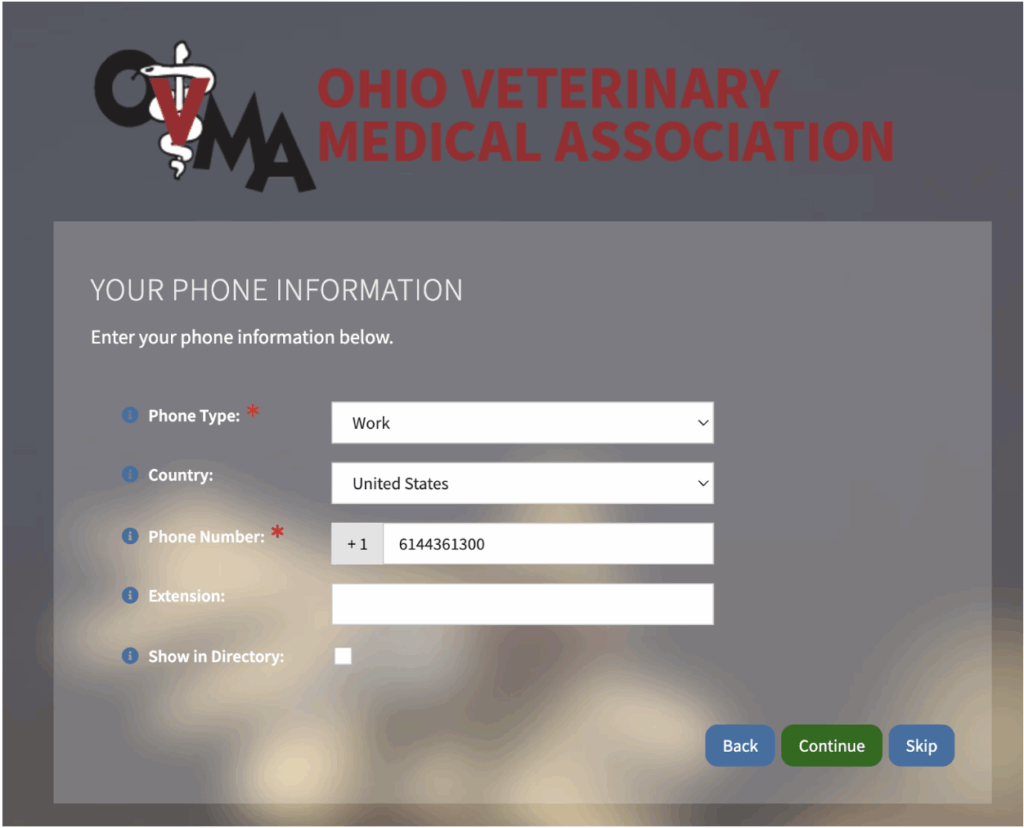
Page 4-5: If you did not link your address and phone to your organization, please provide your address and click “Continue.” On the next page, provide your phone number, or you may skip this.
3. Once your account is created and you are logged in, you’re ready to register! Click here to continue.
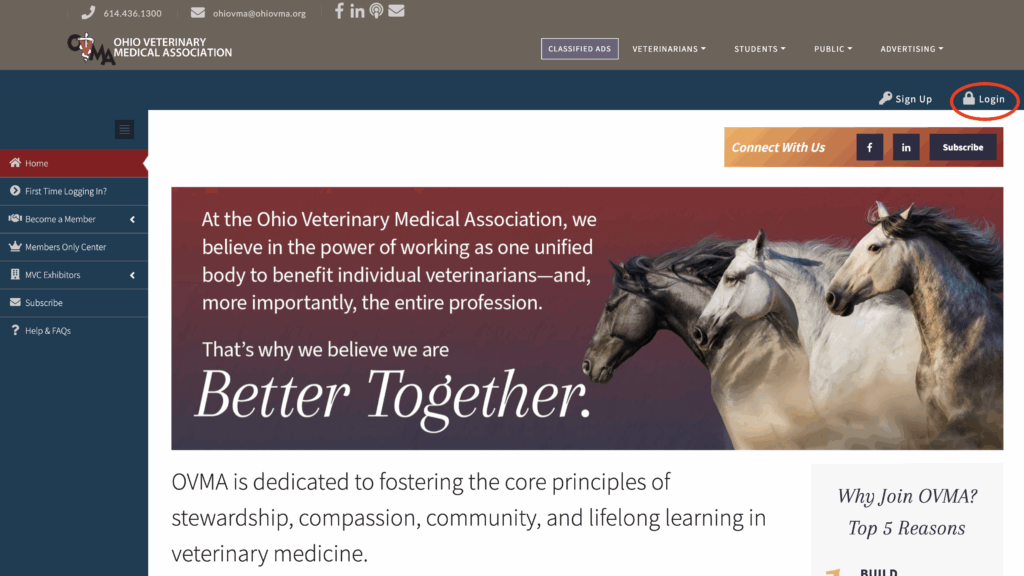
OVMA Members and Recent Attendees: Log in to your account
If you are a recent MVC attendee (registered for the 2022-2025 MVCs) and/or are an OVMA member, your account has been imported to our new system.
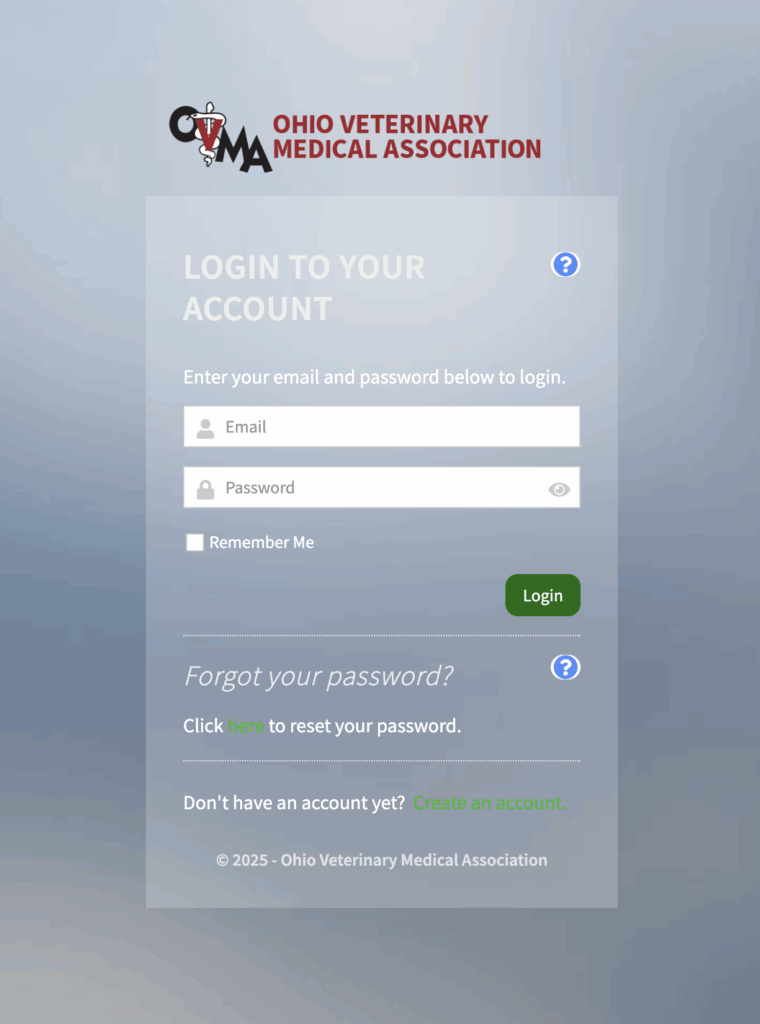
1. Click here to go to the MVC registration system (link will open in a new tab) and click “Login.”
2. Log in or set your password.
If you have logged in to the new system since its was launched in August 2025, enter your email and password.
If this is your first time logging in or you cannot remember your password, click the link in the “Forgot your password?” section to (re)set your password. Enter the email address on file with OVMA. You will receive an email with instructions for setting your password.
Now that you’re logged in, it’s time to register! Click the option below that best fits your situation.
Individual Registration
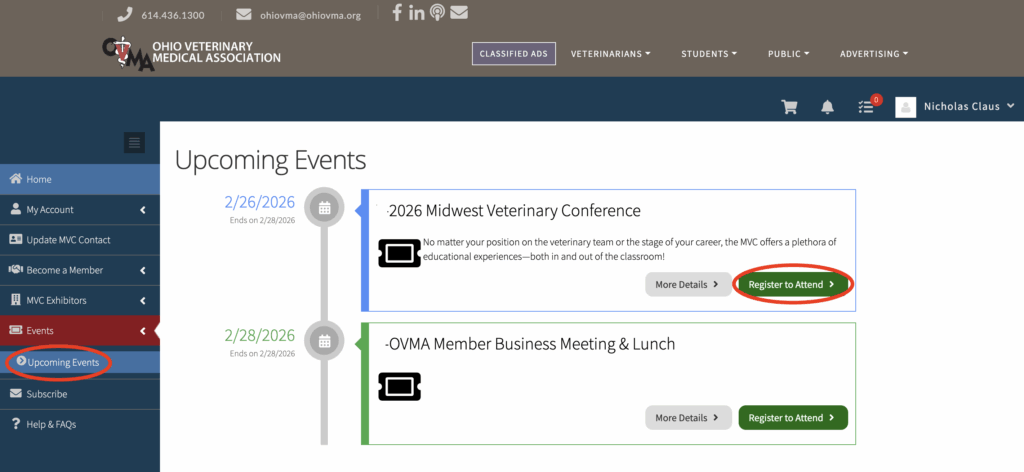
1. Click on “Events” in the sidebar, then on “Upcoming Events.” In the 2026 Midwest Veterinary Conference box, click on “Register to Attend.”
2. Select your registration options and answer additional questions as needed, then click “Next.”
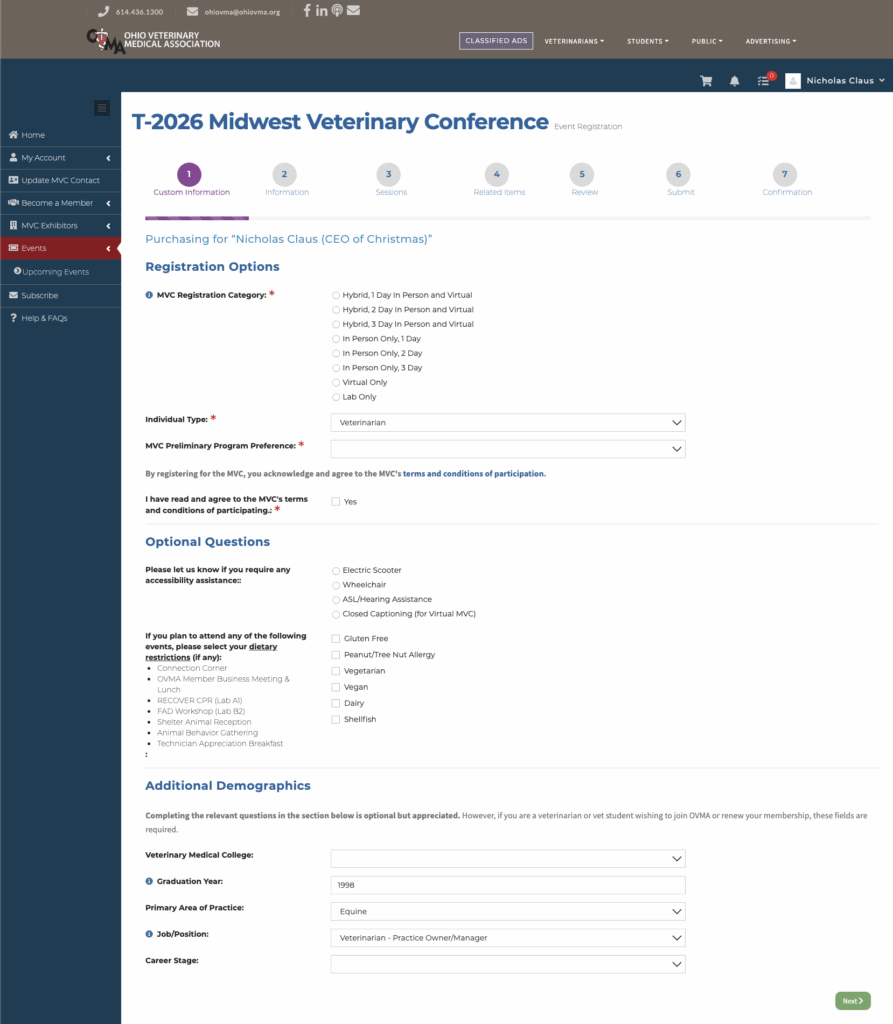
Registration Options
- Choose how you want to attend the conference:
- Hybrid: Includes the live/in-person MVC for the number of day(s) you select, as well as full access to the Virtual MVC.
- In Person Only: Access to live MVC on day(s) you select.
- Virtual Only: Access to online/on-demand portion of MVC. Learn more »
- Select your individual type (if not already provided).
- Select how you wish to receive future programs.
- Accept the terms and conditions of participation.
Optional Questions
- Answer the optional questions if any of the following apply:
- You need assistance per the Americans with Disabilities Act.
- You are attending a session or special event where food is being served, and you have any dietary requirements.
- Otherwise, you can skip this section.
Additional Demographics
- If you are an OVMA member or wish to be, please complete these fields in order to generate the membership option(s) that best apply to your situation.
- If you are not a veterinarian, providing additional demographics is optional but appreciated.
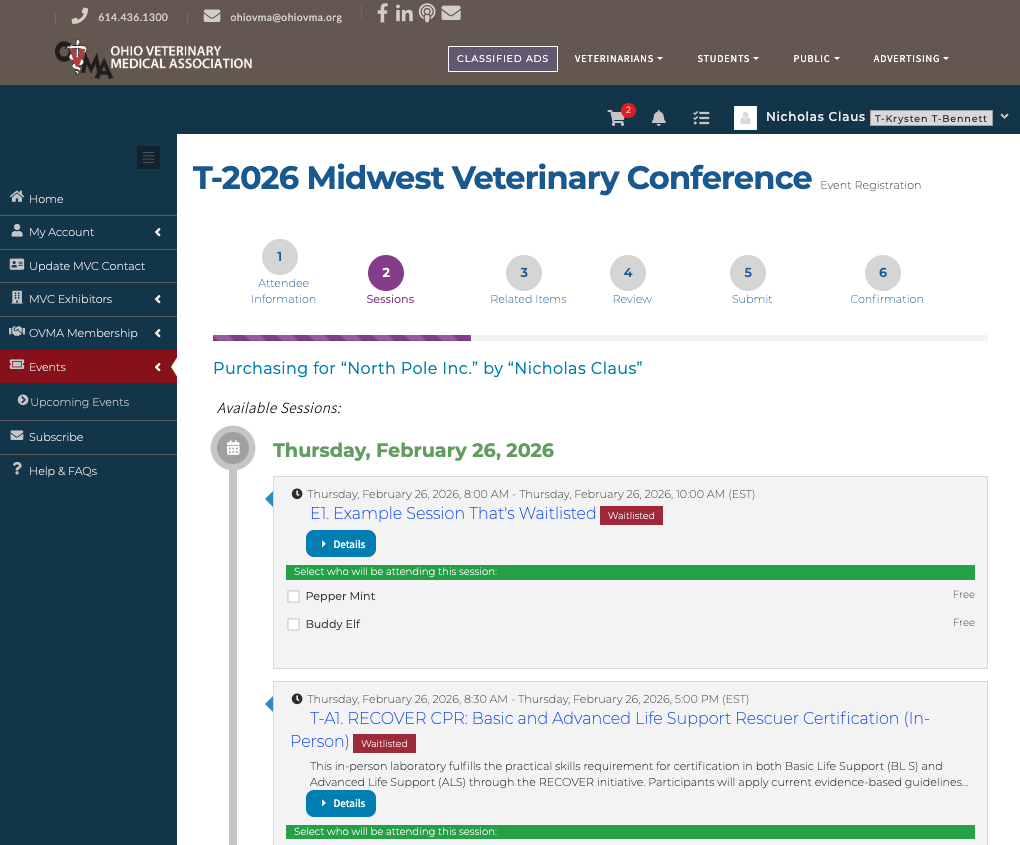
3. Select any special events and/or hands-on labs you wish to attend, then click “Next.”
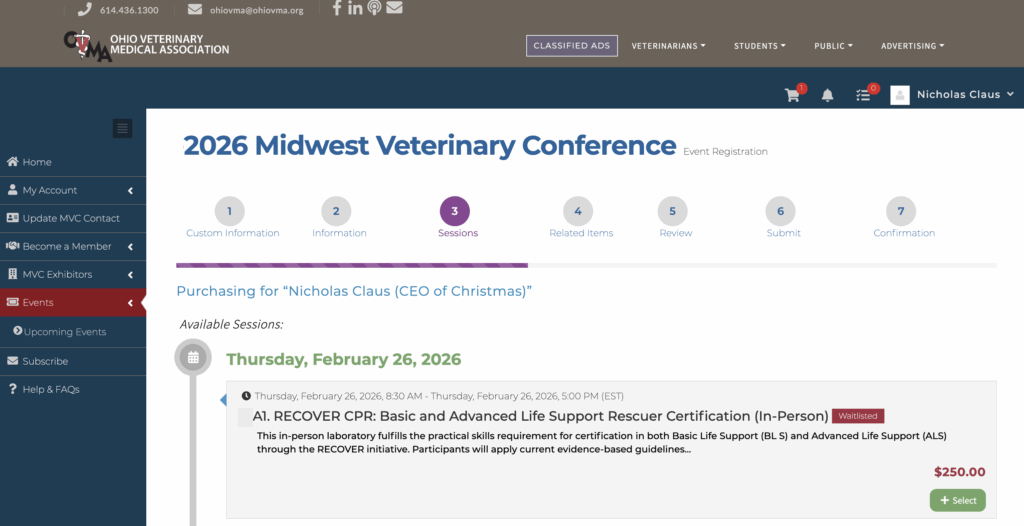
This page contains only the sessions that require additional payment and/or advance registration. You will be able to build your complete schedule after registration is complete. More information will be in your confirmation email.
If an event you would like to attend has reached max capacity, a red “Waitlisted” icon will appear next to the session name. You can join the waitlist by clicking the “Select” button. You will NOT be charged the fee.
If you do not wish to attend any special functions, you can skip this page.
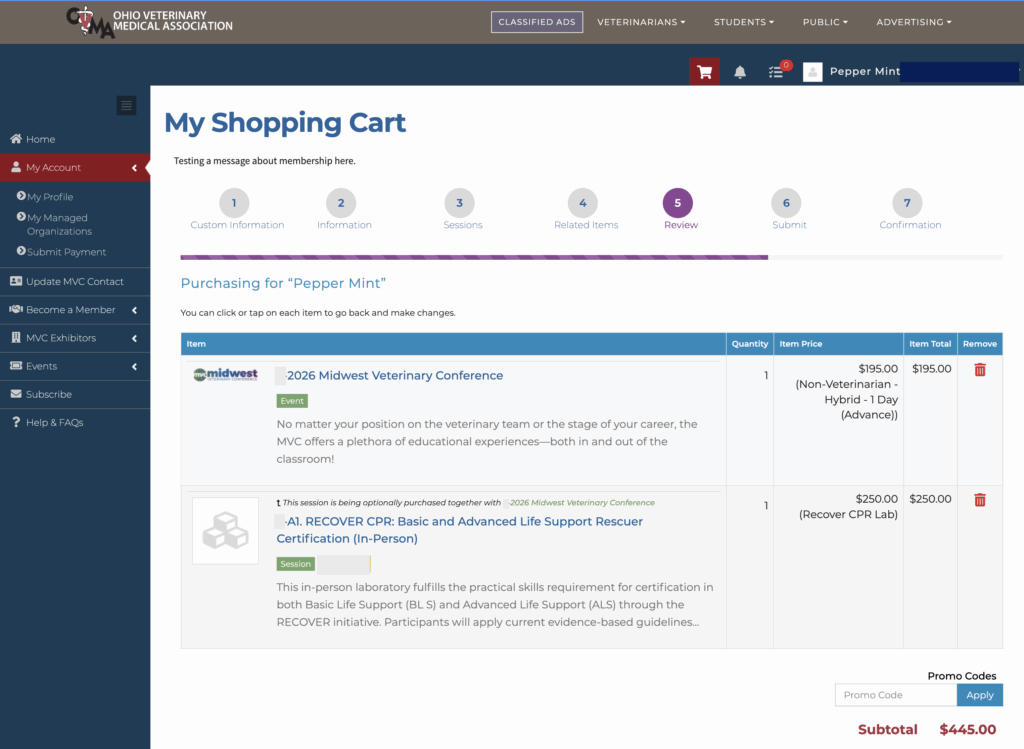
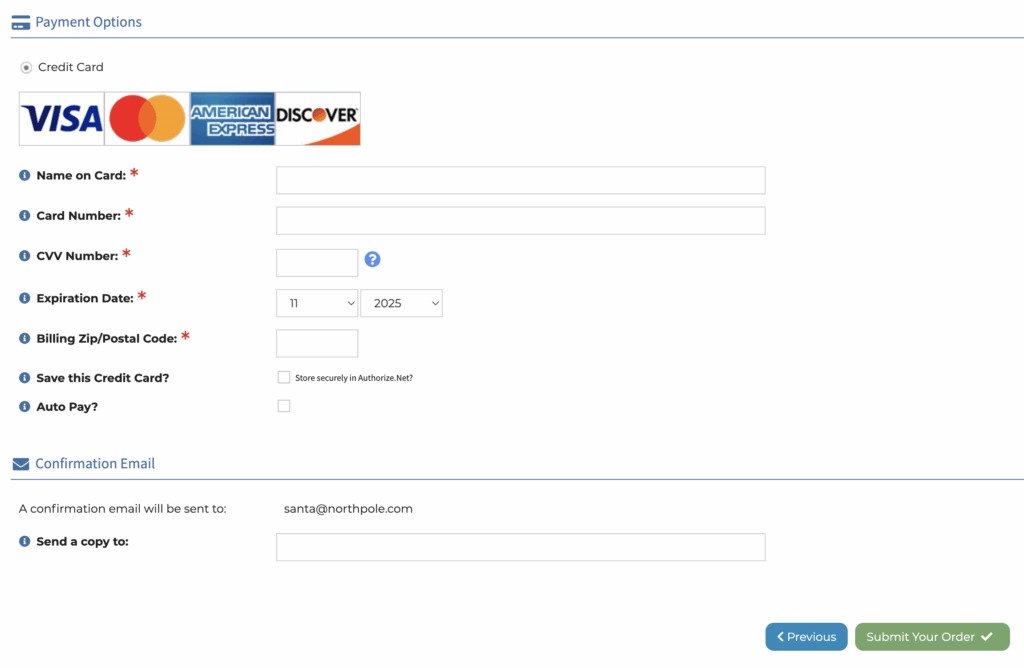
4. Review your registration summary and submit payment.
If you need to make changes, click on the event name to go back to the first page. If you need to remove an item, click the red trash can to the right. If everything looks good, click “Checkout” to proceed to the payment page.
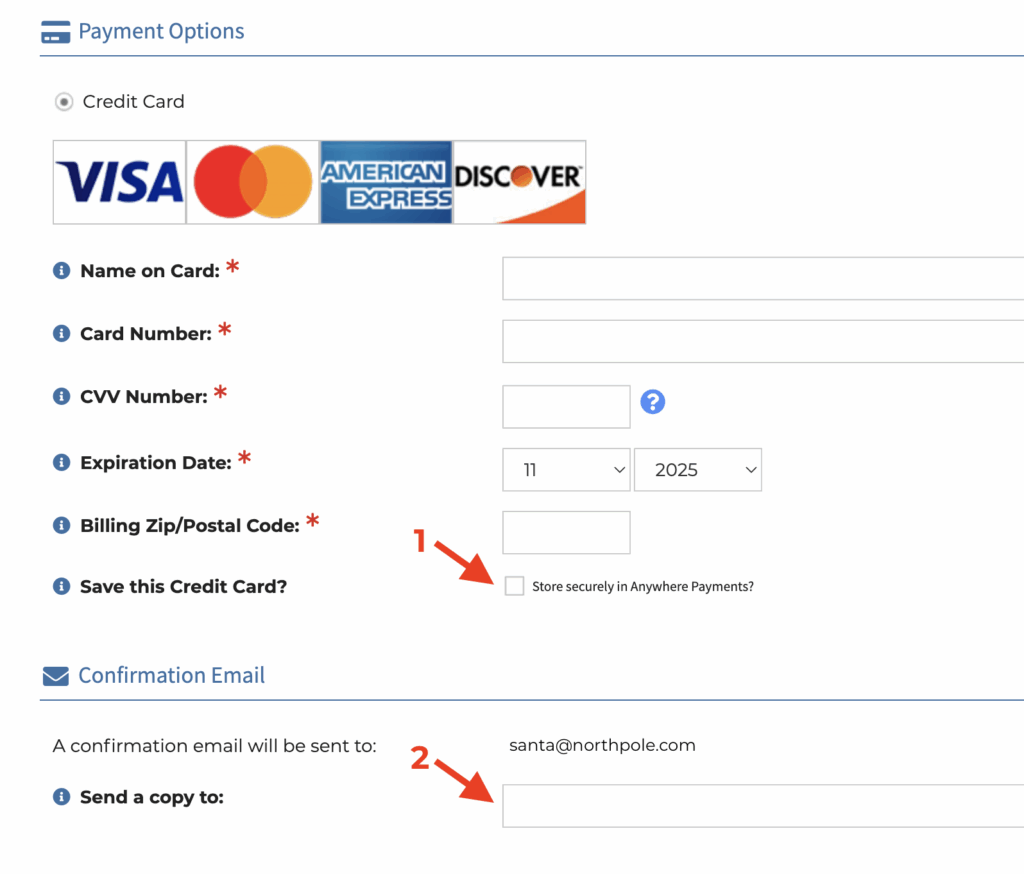
On the payment page, enter your payment information and enter the following as needed:
- Check the box next to “Save this Credit Card?” if you wish to keep your payment on file for future purchases. If you select this option, you will need to agree to the terms and conditions, which will appear on screen for you to review when you check the box. Please note, OVMA does NOT have access to your credit card information.
- Send a copy of the confirmation email to someone else by adding their email to the text field indicated below.
Member Registration
1. Please follow the steps outlined in Individual Registration above, but do not check out.
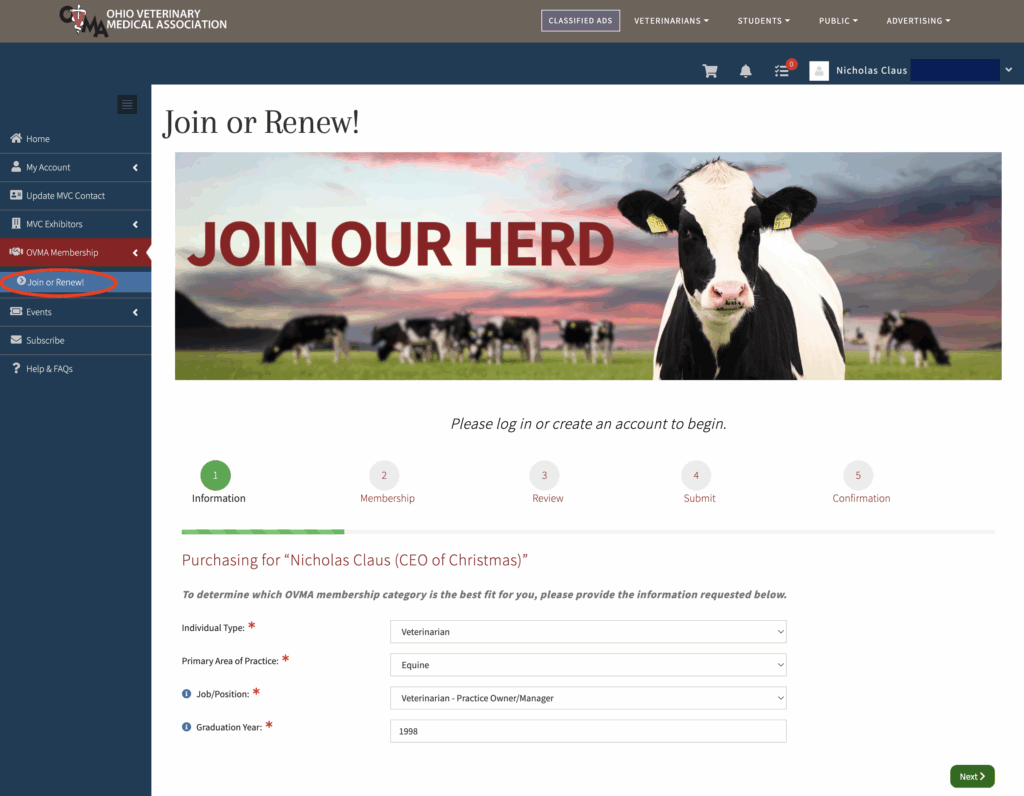
2. Once you have added MVC registration to your cart, click on “OVMA Membership” then “Join or Renew” in the sidebar. Complete all fields and click “Next.”
The information you provide will determine which membership type(s) you are eligible for.
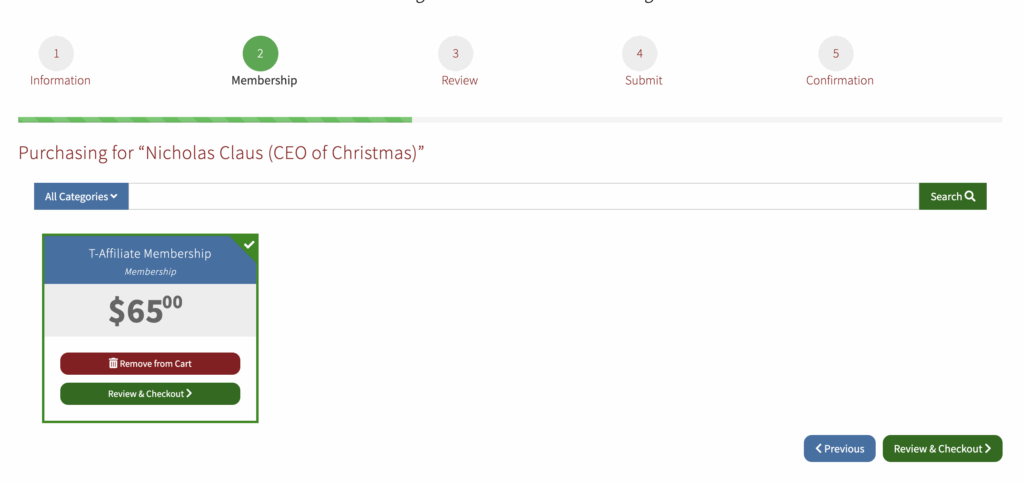
3. On the next page, click “Add to Cart” to purchase the membership you qualify for, then click “Review & Checkout.”
4. Review your order summary.
If you are a new member, your registration price will automatically adjust to reflect the member rates.
If you need to make changes, click the item to go back and revise. If everything looks good, continue to checkout.
5. Enter your payment information and select whether you want to auto-renew your membership.
Check the box next to “Auto Pay?” to automatically renew your membership and pay dues each year. Note: This option requires you to save your credit card on file for future purchases. Review the terms and conditions and check the box to accept.
If you would like to send a copy of the confirmation email to someone else, enter their email in the text box.
Click “Submit Your Order” to complete the process.
Group Registration
Before you begin your group registration, you’ll need to take care of some housekeeping. Our new system requires the following to be completed prior to beginning your group registration.
a) Your practice/company must be set up as an organization in our system.
- Check our organization directory to see if yours is already set up.
- If it’s not, please contact us with your company name and address, as well as the name and email of the person you want to assign as your Primary Contact (see section b)
b) Your organization must have a Primary Contact assigned in our database.
“Primary Contact” is a designation in our database that allows an individual to register multiple individuals and pay their registration fees. If your organization does not have a primary contact assigned, please contact us with the following information:
- Your organization name and address
- The individual’s first and last name and email address
c) All employees you plan to register must be linked to your organization.
Staff can be linked in several ways:
- OVMA may have linked them upon import into the new system. Each person can check their profile to see if the organization is listed, or the primary contact can view their complete organization roster. Find out how »
- Individuals can link themselves to organizations upon account creation (step 2 of the account creation process outlined above) or by logging in and editing their profile (instructions here)
- The Primary Contact can add staff in advance (instructions here) or during registration
Note: If your company would like to pay dues on behalf of veterinarians on your staff, please contact OVMA for an invoice.
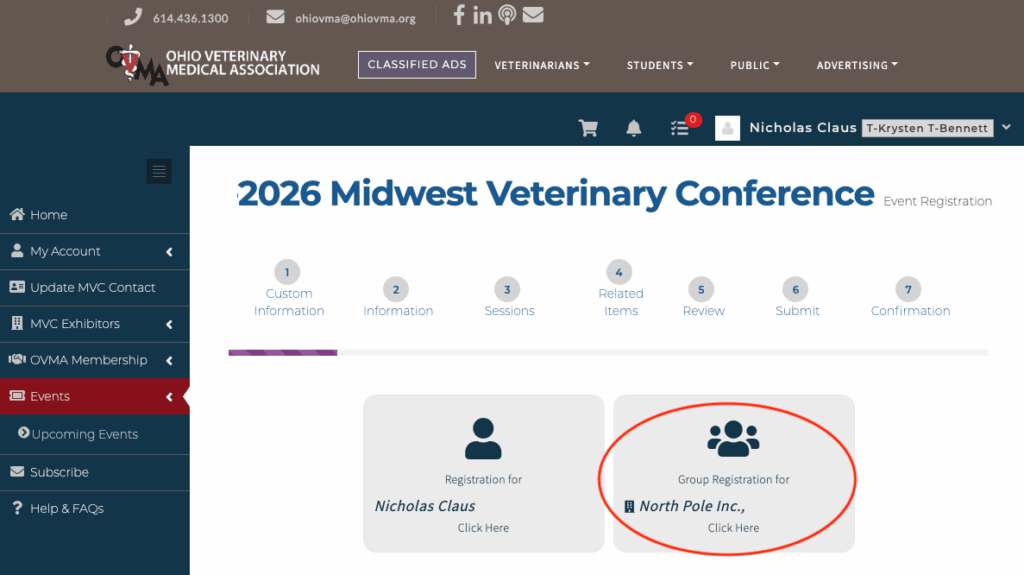
1. Click on “Events” in the sidebar, then on “Upcoming Events.” In the 2026 Midwest Veterinary Conference box, click on “Register to Attend.”
2. Click on your company name.
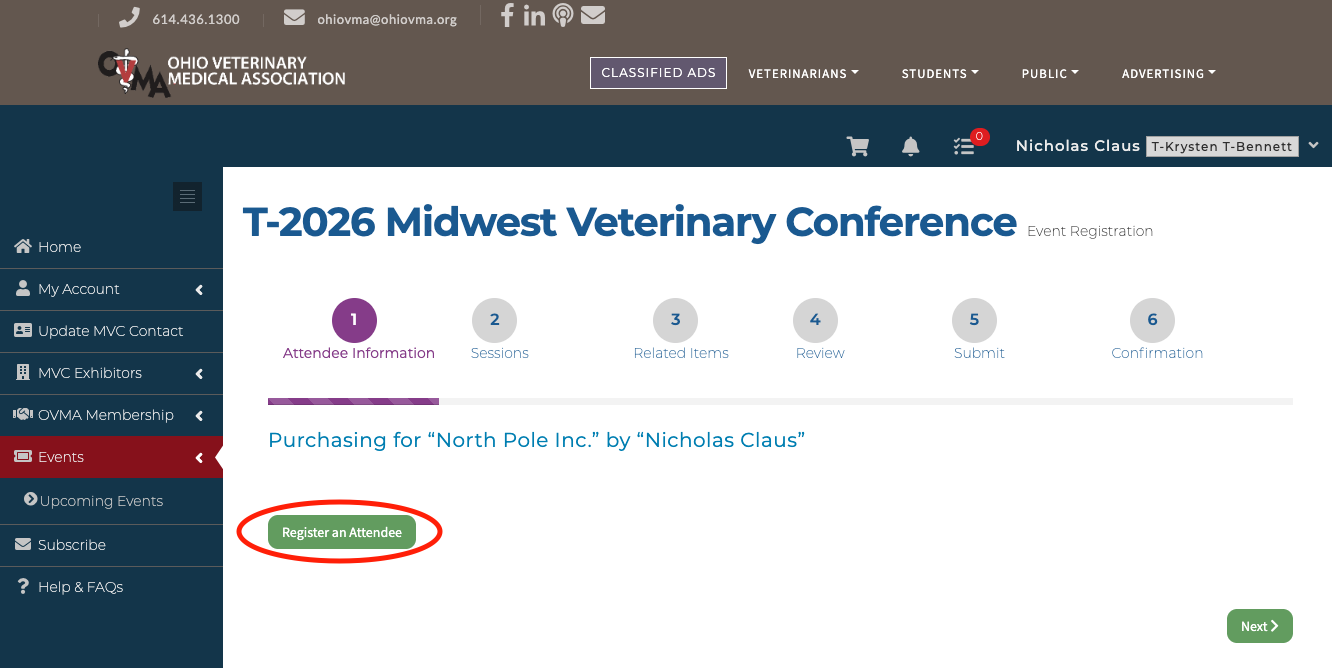
3. Click “Register an Attendee.”
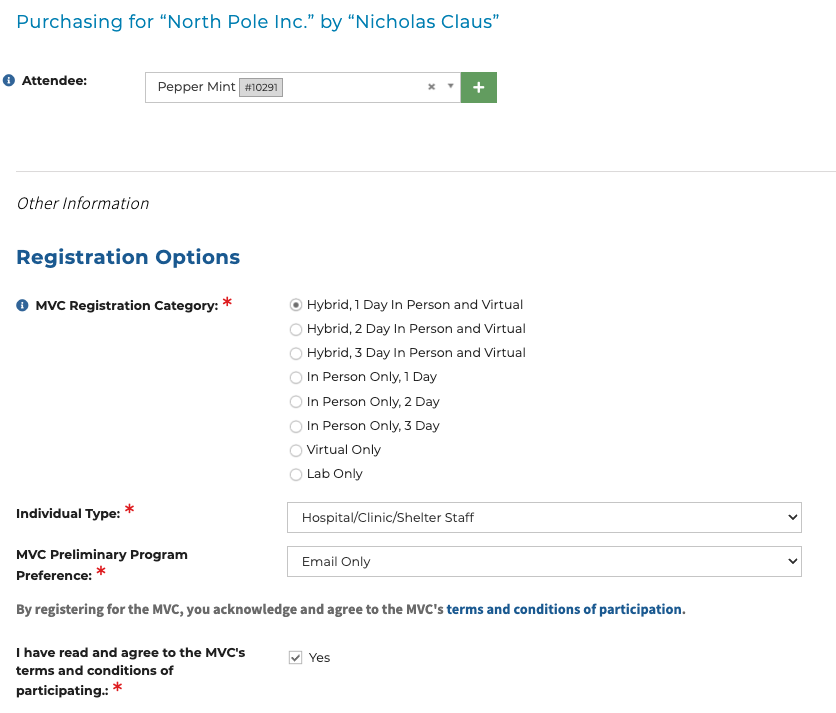
4. Search for or create the staff member you would like to register.
Search for Attendees: First click on “Search for Record” and type in the employee’s name. If the employee exists in our system and is linked to your organization, their name will appear in the drop-down menu.
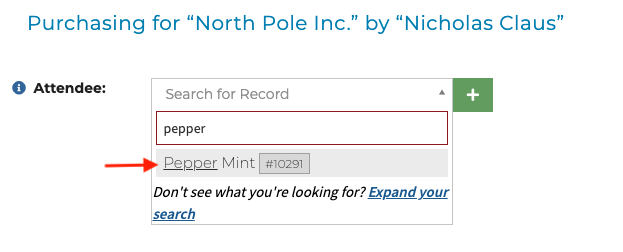
Click their name to select them, then proceed to step 5.
Create a New Record: If the employee does not exist, click the + icon to create a record for them.
You will need to enter their first name, last name, email address, and individual type (vet, tech, etc.). When you are finished, click the “Save” button to add them to your registration.
By default “Send welcome email” is checked. We recommend leaving this checked; this will generate an automatic message to the user that will allow them to set a password and log in.
5. Select registration options and add the staff member to your registration.
After you select an employee, select their registration category, individual type (if not already provided), program preference, and accept the terms and conditions. Complete the optional questions as required to select dietary restrictions and ADA requests.
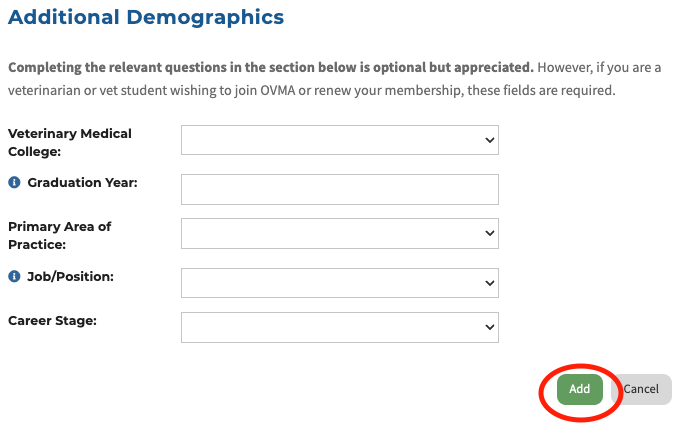
Provide additional demographics if possible, then at the bottom of the page, click the “Add” button.
6. Repeat steps 4-5 as needed, until all employees are added.
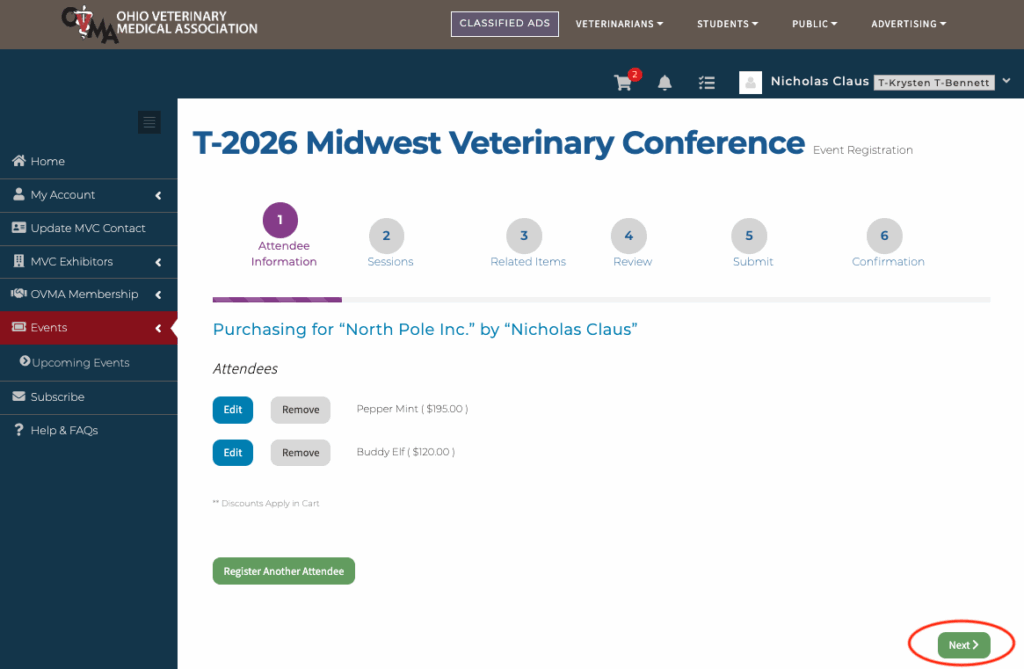
You can review the staff list before proceeding. Click “Next” to continue.
7. Add special events and labs for each registrant as needed.
In each session, check the box next to the individual(s) who will be attending. If you do not need to register anyone for any special events, scroll to the bottom of the page and click “Next.”
8. Review your registration summary and submit payment.
Each attendee’s selections will be labeled with their name. If any sessions were waitlisted, those will be labeled as well.
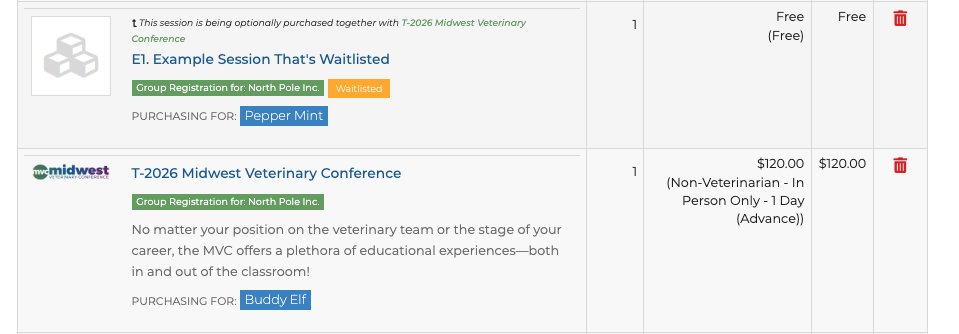
If you need to make changes, click on the event name to go back to the first page. If you need to remove an item, click the red trash can to the right. If everything looks good, click “Checkout” to proceed to the payment page.
On the payment page, enter your payment information and enter the following as needed, then click “Submit Your Order.”
- Check the box next to “Save this Credit Card?” if you wish to keep your payment on file for future purchases. If you select this option, you will need to agree to the terms and conditions, which will appear on screen for you to review when you check the box. Please note, OVMA does NOT have access to your credit card information.
- Send a copy of the confirmation email to someone else by adding their email to the text field indicated below. Note: All registrants will receive a confirmation email by default.
Change Your Existing Registration
Add Labs and/or Special Events
1. Click here to log in to your registrant account.
2. Navigate to your registration.
(1) Go to the “Purchases” tab of your profile, then (2) click on “Events.” (3) Click the “Details” button next to the 2026 MVC.

3. Click the “Add Session” button under “Order Details” in the right sidebar.

4. Select the labs and/or events you would like to add to your registration, then proceed to checkout.
If a lab you would like to attend is sold out, you may join the waitlist here.
Add sessions to your schedule
1. Click here, then click the Sign In button in the top right corner.

On the login page, use the email address and password you set up during registration.
Note: If you are already logged in to the registration system, you will be automatically logged in to the learning platform.
2. Follow the prompts to complete the check-in process.
Click here to learn more about this »

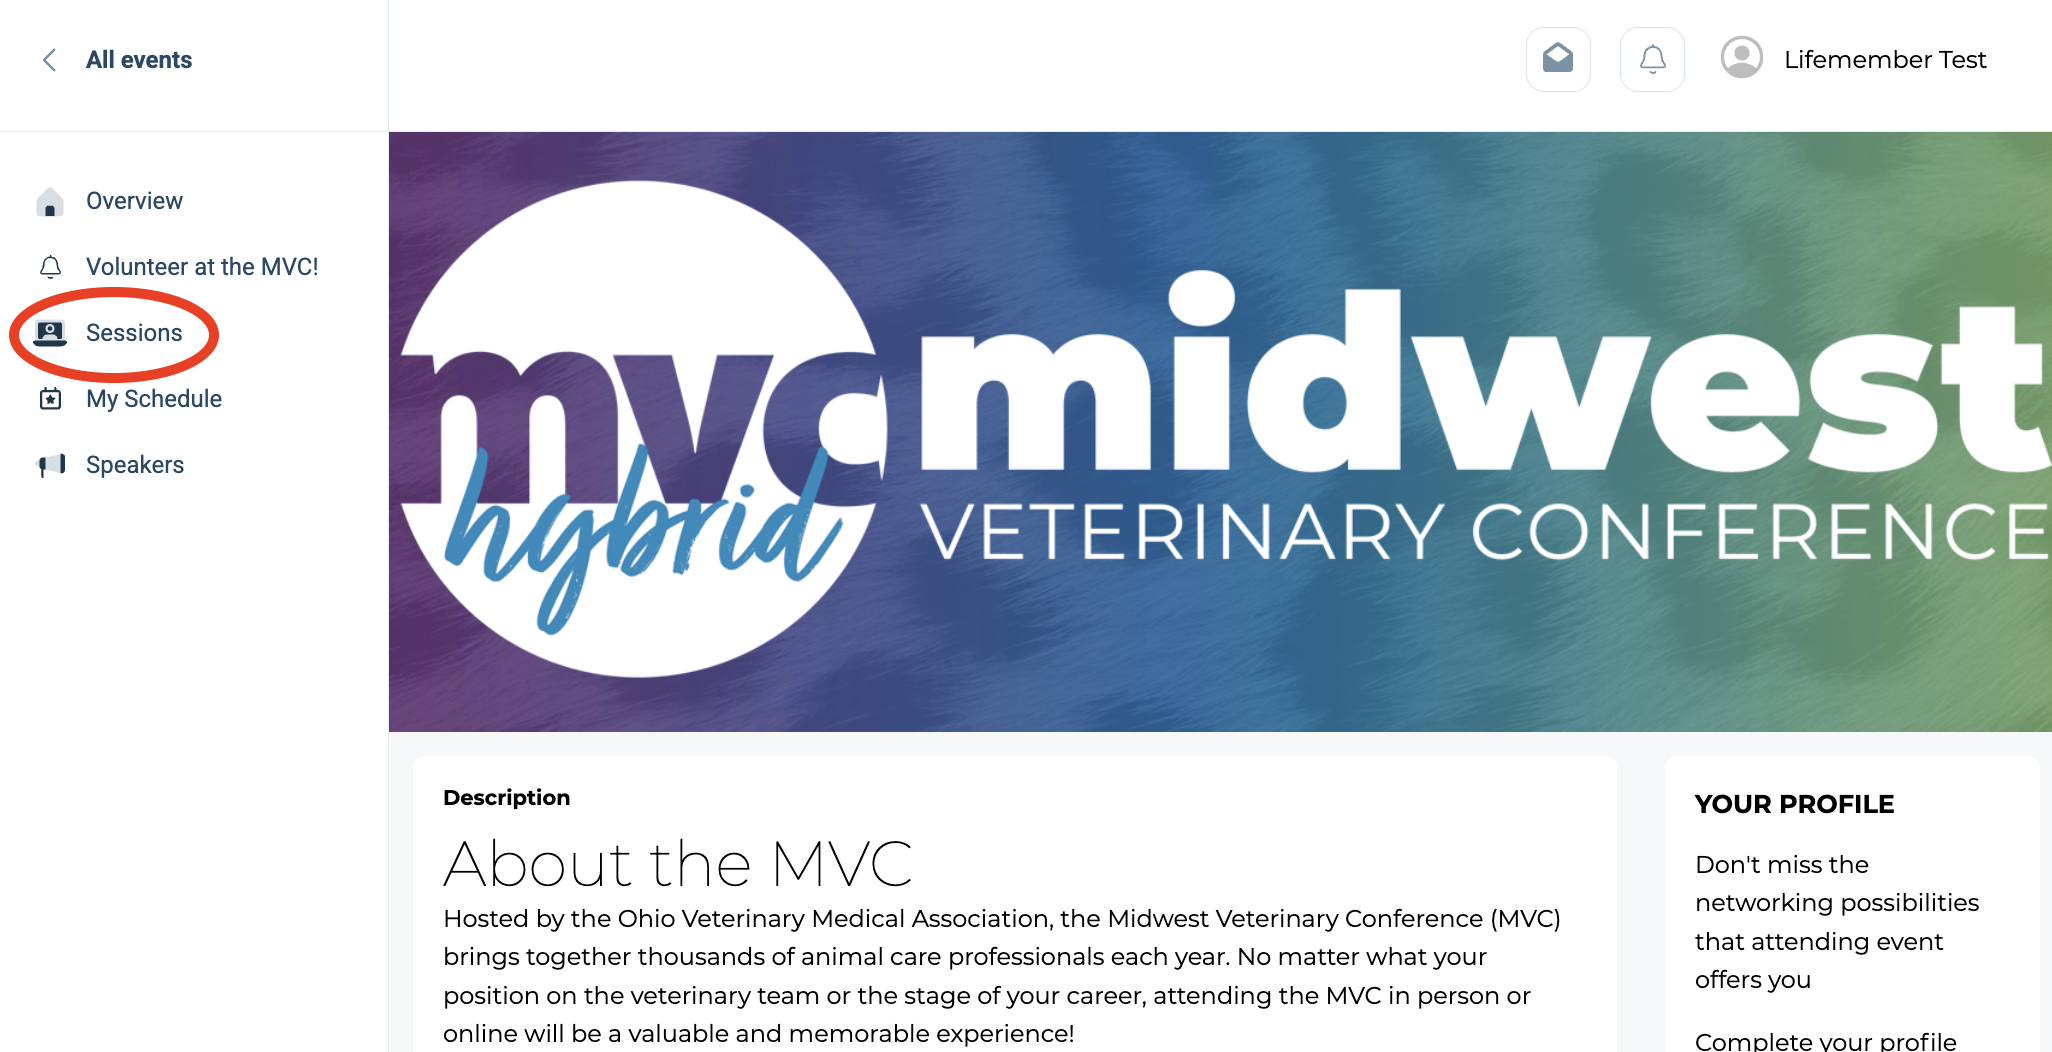
3. Click the “Sessions” tab in the left sidebar.
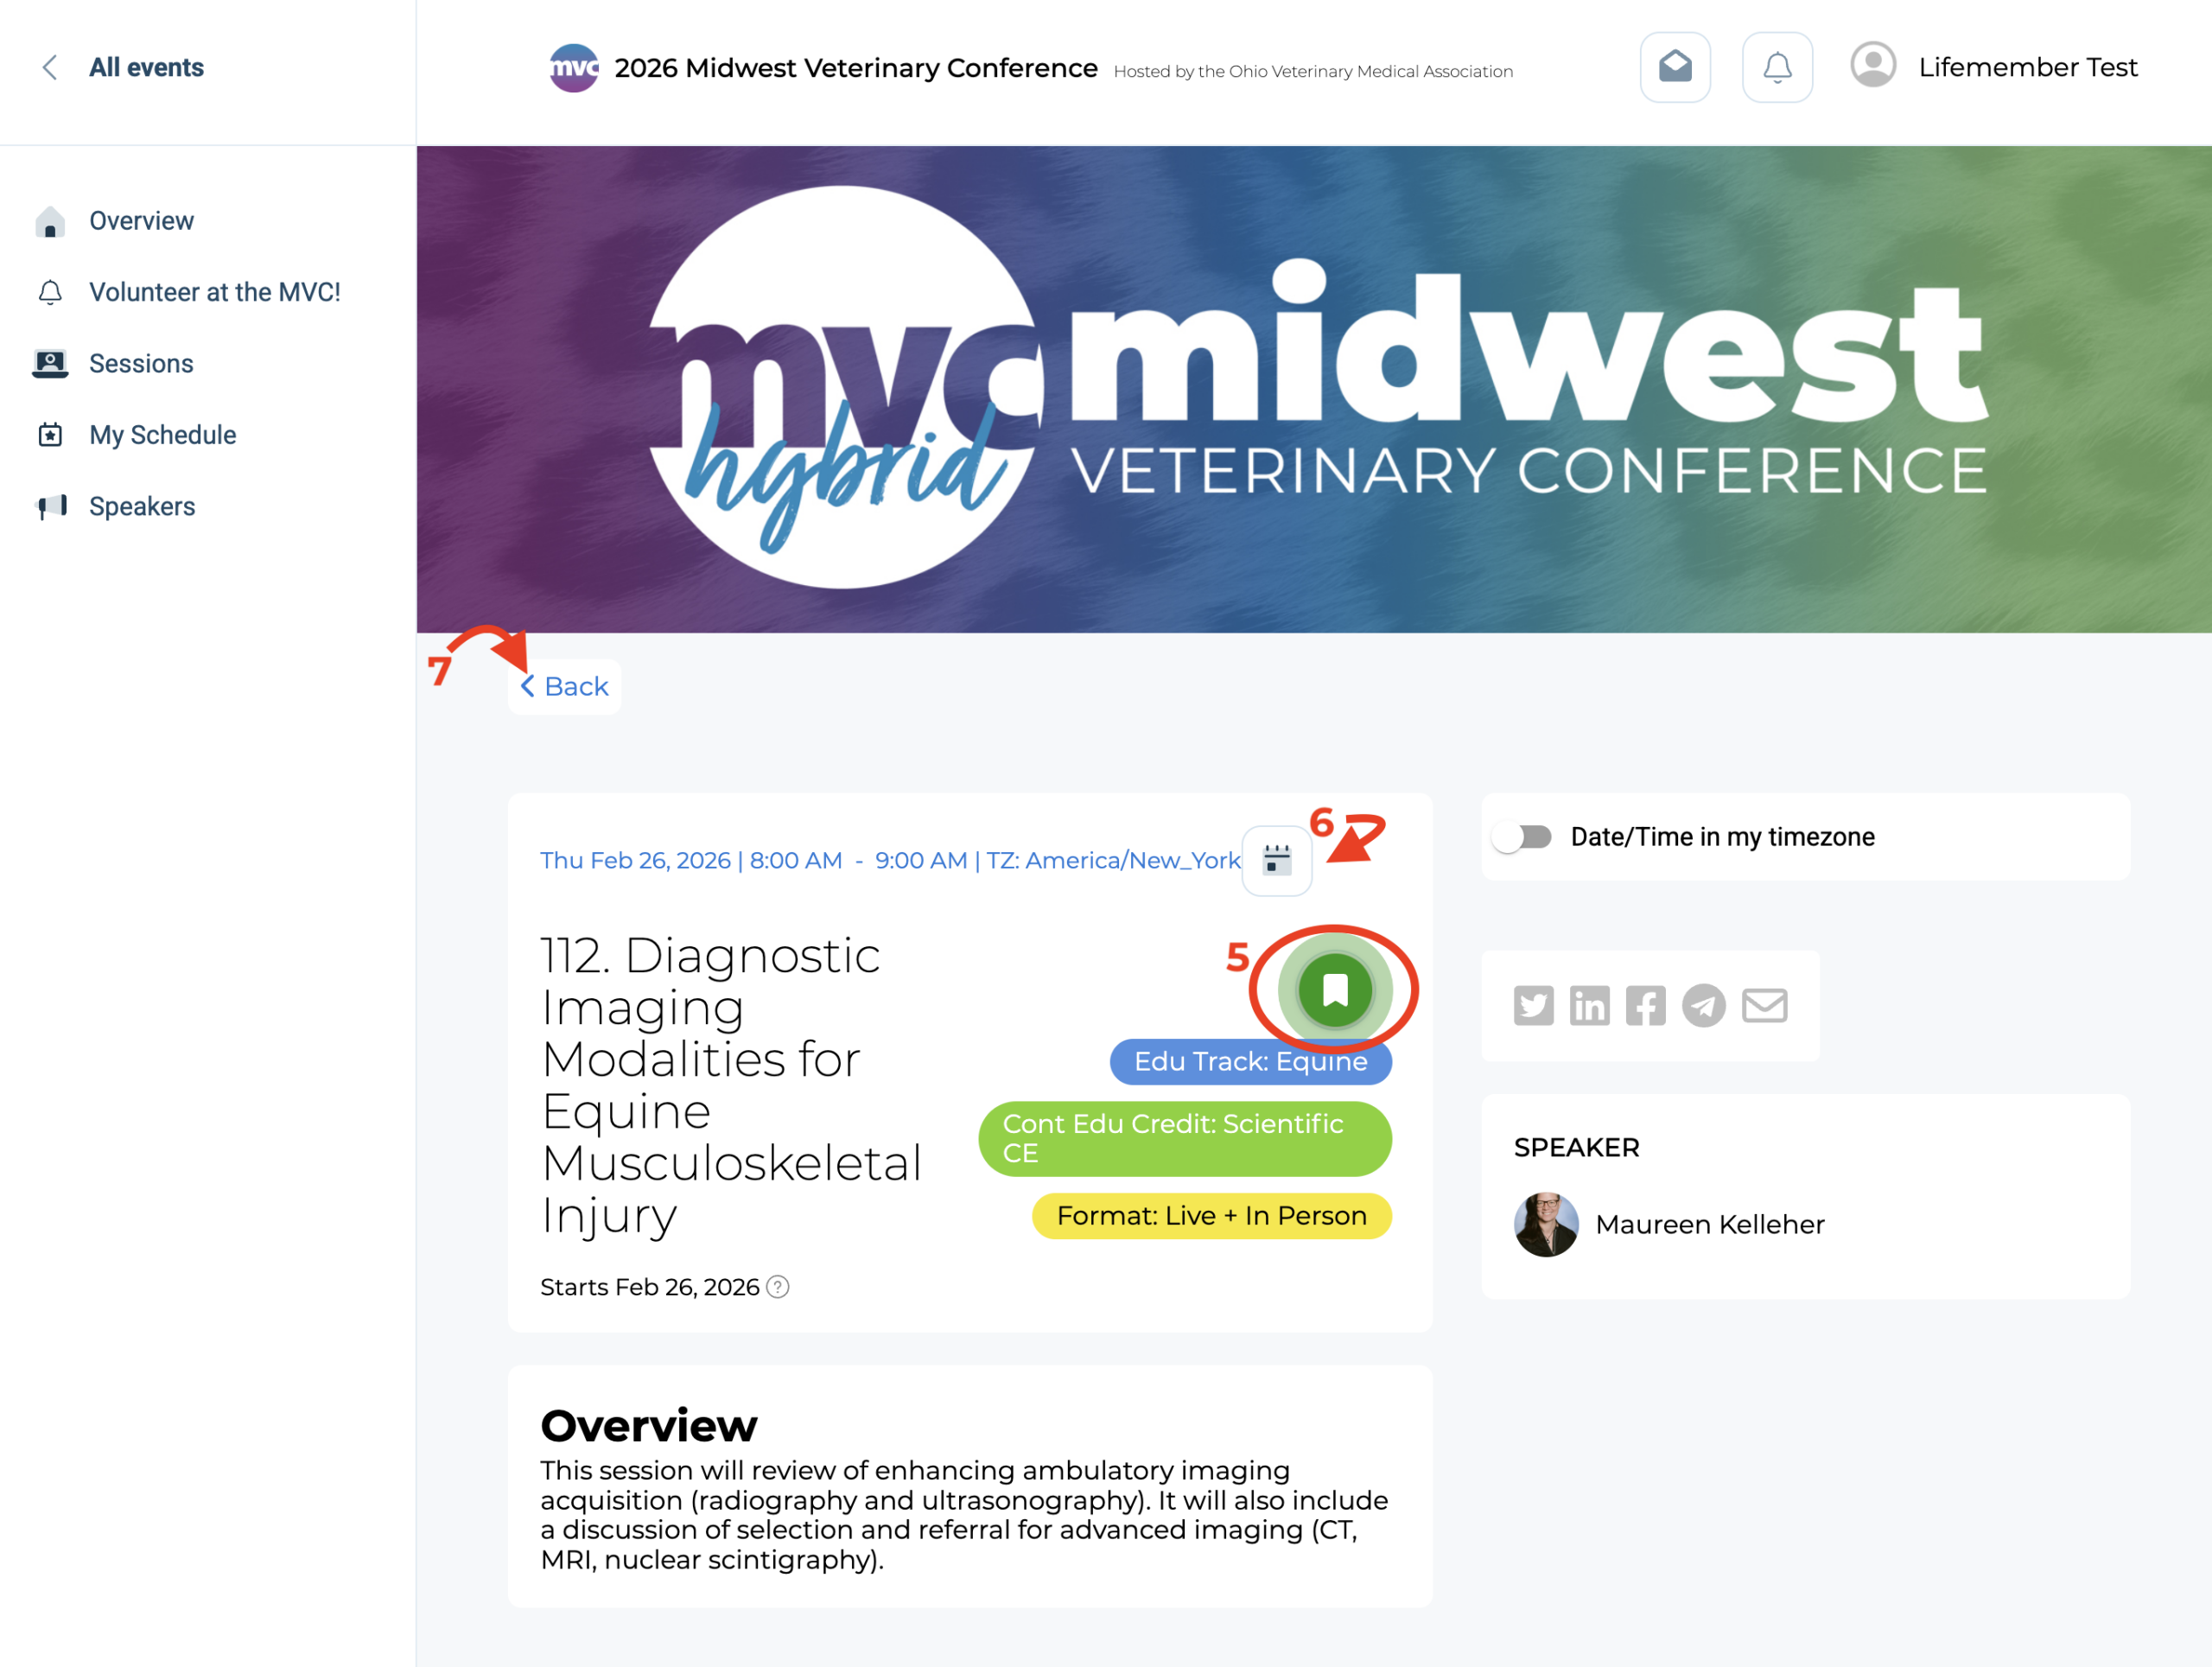
4. Build your schedule.
Search for sessions by (1) typing a session number or keyword in the search box or (2) filtering by track or format. Browse all sessions or sort by day by (3) selecting the appropriate tab. Then, (4) click on the session you wish to attend to open the details page.

To add a session to your registration, (5) click the green bookmark icon next to the title. The icon will turn white to indicate the session has been added. Click again to remove it.
NOTE: Clicking the (6) calendar icon will allow you to add the event to your device’s calendar. It does NOT add it to your registration.
Click the (7) back button to return to the sessions page. Repeat the process as needed to build your schedule.
5. Review your selections by clicking “My Schedule” in the left-hand column.

Upgrade an in-person only registration to include Virtual MVC access
Please note: You MUST have an existing 2026 MVC registration in order to upgrade.
1. Click here to log in to your registrant account.
2. Click on “Events” in the sidebar, then “Upcoming Events.”

3. Click the “Register to Attend” button in the “2026 Virtual Midwest Veterinary Conference: UPGRADE” event.
Alternatively, you can click here to go directly to the registration page.

4. Follow the prompts to check out and submit your payment information.
You will receive an email confirming your registration was successfully processed.