Getting Started
Step 1
Download and Open App


Tap the appropriate icon above, or search for “Midwest Veterinary Conference” in the Apple or Android app store.
If you already have the app from the 2025 MVC, you do not need to re-download it.
Step 2
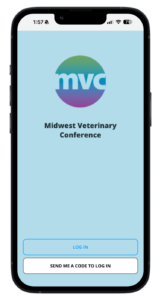
Log In
Use the email and password you set up during registration, or request a verification code via email to log in.
If requesting a verification code, you must use the email address associated with your registration.
Step 3
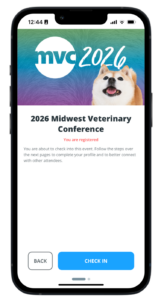
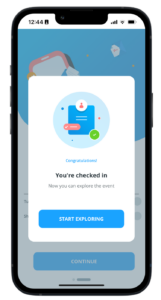
Select Event & Check In
Tap on the 2026 MVC, then tap “Check In” to review and update your profile and opt in to networking. A quick guided tour will follow.
Need help logging in and checking in? Click here for step-by-step instructions with screenshots »
Want to use the app on your computer?
Note: Certain features are not available when using in a web browser.
Did you know? You can use the app to…
…build your schedule
Adding sessions to your agenda allows you to claim CE credits, view session documents, and complete session surveys.
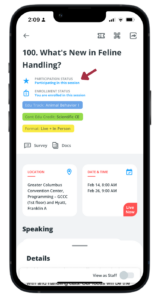
- Tap the “Agenda” icon at the bottom of the screen
- Tap on the session or event you wish to attend
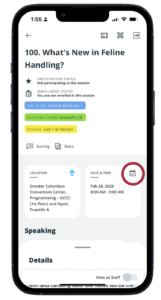
- Tap the calendar icon in the Date & Time box to add it to your registration
- Once added, you will see your enrollment status (underneath the title) update to “Enrolled”
- Repeat the process as needed to build your entire schedule
- View and edit your sessions by tapping the “Your Agenda” tab
…view session documents
Adding sessions to your agenda allows you to claim CE credits, view session documents, and complete session surveys.
- Tap on a session
- Tap on “Docs” underneath the session name*
- Tap on each file to view it in a browser or save it to your device
*Not all speakers provide supplemental materials for their sessions.
…create your CE certificate & transcript
If you plan on using the mobile app to track your CE, you must check in to sessions** in order to:
- be awarded CE credit
- add the session to your transcript
How to claim your CE credits:
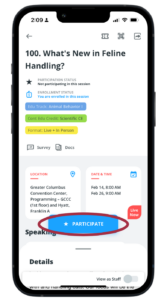
- Tap on a session in your agenda
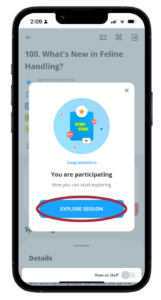
- Once the session begins, tap the “Participate” button
Forget to tap “Participate” during a session during the session? No problem! The check-in period will remain open for 7 days after the session’s end time.
**You are not required to use the mobile app to track your CE. You will still earn your credits, but you must keep your own record. See on-site program for details.
…generate and save your CE certificate & transcript
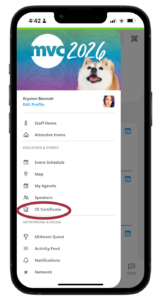
- Tap on the three horizontal lines in the top left corner, then tap on “CE Certificate”
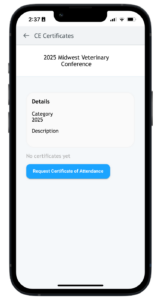
- Tap on “Request Certificate of Attendance”
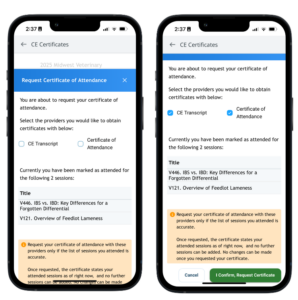
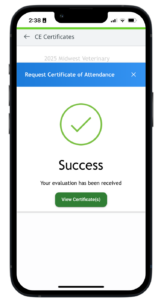
- Select which certificates you would like to generate, then tap the confirmation button
- When the success message appears, tap “View Certificate(s)”
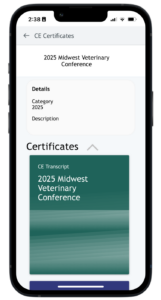
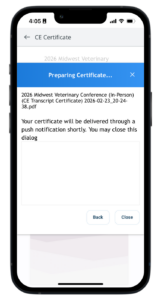
- Tap on each item, then tap “Generate Certificate”
- Tap “Download” to save a PDF to your device
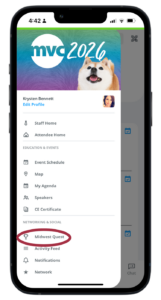
…play the Midwest Quest game
Complete challenges hidden throughout the event for your chance to win one of four $250 Amazon gift cards!
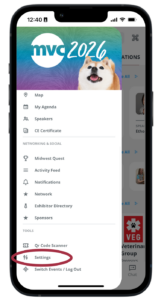
- Opt in to networking by tapping on the three horizontal lines in the top left corner, then on “Settings” under “Tools”
- On the home screen, scroll down to the “Win Rewards” section and tap “View Contest”
- Tap “Enter Contest”
- Complete challenges by scanning QR codes in participating exhibitor booths, attending events, and connecting with other attendees
- To scan a QR code, tap the QR icon in the top right corner of your screen
In the event of a slow or lost connection, your points will be added once internet is restored.
…complete session surveys
- Tap on a session, then tap on “Survey” under the session title.
- Provide a rating for the session and speaker, add comments, and tap “Preview Submission,” then tap “Submit”
Rate at least three sessions to be entered in a drawing to win one of two $50 gift cards! See on-site program for details.
Mobile App FAQs
Getting Started
I already have the app from last year. Do I have to download it again?
No, if you have last year’s app, you already have the app for this year, too!
How do I download the Mobile App?
Search for “Midwest Veterinary Conference” on your Android or iOS device, or tap on the appropriate link below to go directly to the app in the app store.
My Android phone is asking for age verification. What’s this?
The Google Play store is rolling out an age verification update to access content on the app, which can be triggered if the user has not set their age. Some users may be prompted to upload a photo of their driver’s license for verification. If this happens to you, we recommend taking the following steps:
- Open the Google Play Store.
- Tap your profile picture in the top right corner.
- Go to Payments and subscriptions, then select Payment methods.
- In some cases, it may show as Settings, then Family, then Verify your age (depending on the region or account).
- If your account needs verification, you will see a banner that says Verify your age or Confirm your age to access certain content.
- Tap the banner and choose one of the methods that Google offers. The options may include a government ID, a credit or debit card, or a selfie video.
- Follow the instructions on the screen and submit your information.
Alternatively, you can click here to go to your Google account and then click “Verify your age.”
How do I log in?
|
|
|
|
|
|

How do I set up/edit my profile?
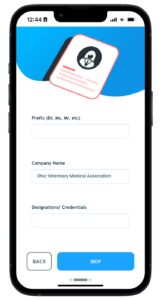
If you did not set up your profile during the log in/check in process described above, or you would like to make changes it it later, you can do so by following these steps:
|
|
|
Learn more about your profile in the Networking & Privacy section below.
Sessions & CE
How do I find sessions and events?
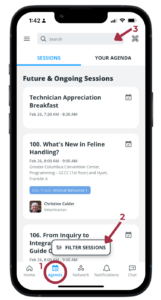
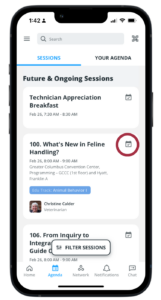
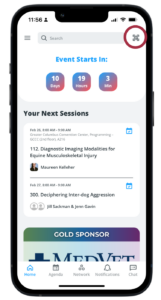
Tap the Agenda icon at the bottom of the app (1) to view future and ongoing sessions in chronological order. Tap the Filter Sessions button (2) to sort sessions by date, location, track, format, audiences, skill levels, and CE credit type. You may also search for a session by typing in the search field at the top of the screen (3).
How do I view the session/event descriptions?
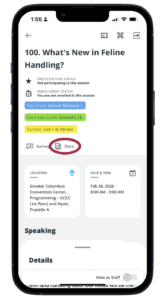
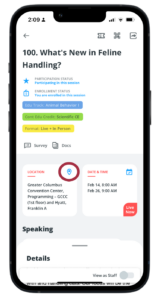
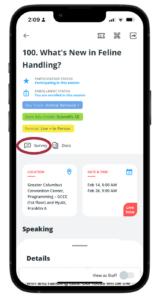
Tap on a session, then swipe up on “Details” to view the description.
How do I access session notes and speaker presentations?
If a speaker has provided supplemental materials, you can find them in the mobile app by opening a session and tapping the “Docs” link. Tap on the document(s) to view in your browser or save to your device.
How can I track my CE credits in the app?
You can use the app to track your CE credits by following these steps:
1. Register for sessions by adding them to your agenda.
|
|
|

2. When a session you are enrolled in begins, you will be able to check in.
|
|
|
These two steps MUST be completed for the session to be added to your transcript and CE certificate.
Notes:
- Please note this process is not available in the web version of the app. You can add sessions to your registration/agenda, but you will not be able to mark yourself as a participant.
- You are not required to use the mobile app to track your CE credits. You will be awarded your credits even if you do not use the app, but you will have to manually track the sessions you attend.
What if I forget to check in during a session?
If you forget to check in during a session, you can do so up to seven days after the session’s end time by following the steps in the previous question.
After the seven-day grace period ends, you will need to contact OVMA to complete the process for you.
How can I access my CE certificate and transcript from the app?
Before following the steps outlined below, make sure all sessions you attended have been marked “Participate.” (See “How can I track my CE credits in the app?” above.)
|
|
| |
|
|
|
|
Is the app the only way to receive my CE Certificate?
No, you are not required to use the app to track your CE. You will still earn your credits, but you must keep your own record. A blank certificate and CE record appear in the on-site program. You can complete these items on site and have them signed by OVMA staff if your state requires verification (note: Ohio does not).
Networking & Privacy
What can I do with the networking feature?
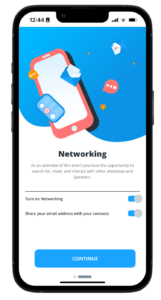
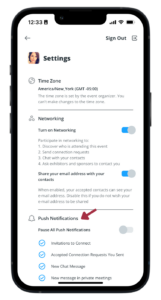
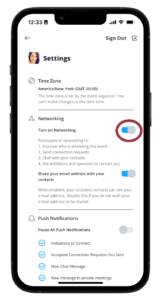
By turning on “Networking” from within the “Settings” menu, you make your profile discoverable by other attendees. This allows you to:
- send/receive connection requests to/from other attendees
- chat and set up private meetings with your connections
- ask exhibitors and sponsors to contact you
- join and participate in the Midwest Quest game
How do I network with others?
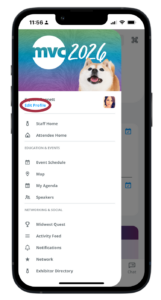
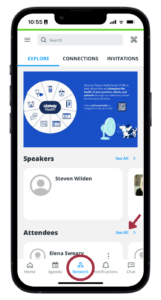
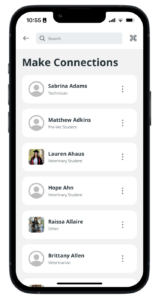
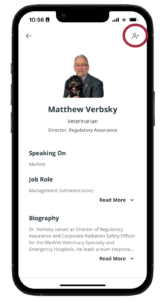
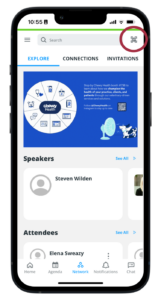
Enable Networking from the Settings menu, then tap Network at the bottom of your app to explore and/or search attendees, speakers, exhibitors and sponsors. Tap the + icon with each profile to send a connection request. Track your connections and invitations at the top of the Network screen. You can also send your connections chat messages via the Chat icon at the bottom of your app.
Who can see my profile? What information do they have access to?
By default (with the exception of speakers, sponsors and exhibitors), your profile and related information is private, and not able to be seen by other attendees/app users.
However, if you turn on “Networking” from with the “Settings” menu you can:
- Allow your profile to be discovered on the app, and discover profiles of other attendees
- Send/receive connection requests to/from other attendees
- Chat with your connections/contacts within the app
- Ask exhibitors and sponsors to contact you
How do I opt in/out of notifications?
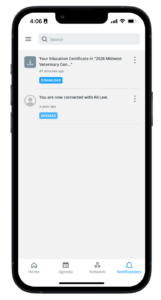
By default, you are opted in to receive app notifications. This allows you to receive push messages like connection invitations from other attendees, accepted connection requests, and chat messages, as well as important MVC-related updates.
To turn notifications off:
|
|
|
How do I connect with other attendees?
The MVC is a great way to expand your network! You can find people to connect with and break the ice using the mobile app… plus, by doing so, you will earn points in the Midwest Quest game.
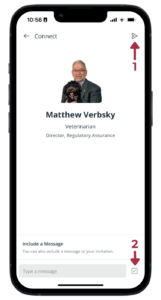
Sending Connection Requests
Method 1: From the Network tab
|
|
|
|
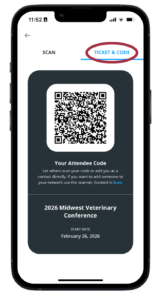
Method 2: Scan an attendee’s QR code
Using this method bypasses the connection request described below, and both attendees will be automatically connected.
|
|
Responding to Connection Requests
When another attendee sends you a connection request, you will receive a notification. Tap the notification in any of the places described below to view and accept or decline it.
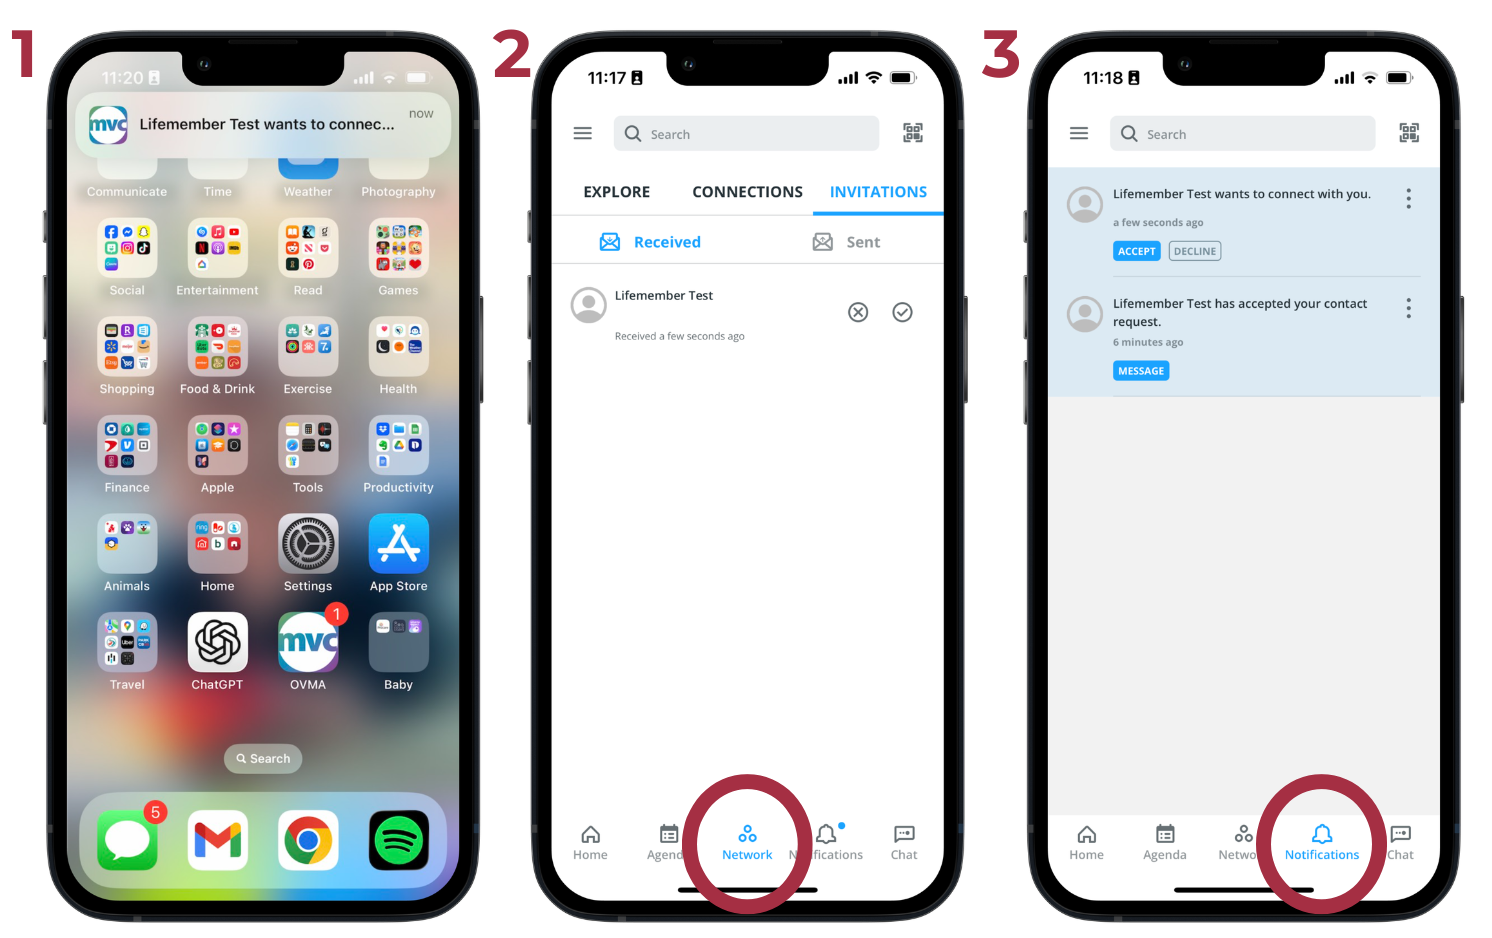
Viewing Your Connections
In the Network section (image 2 above), tap on the Connections tab to view the attendees you have connected with. From there, you can download your contacts, exchange messages, or remove anyone you no longer wish to connect with.
Midwest Quest Game
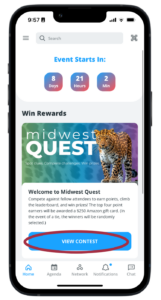
What is Midwest Quest?
Midwest Quest is the MVC’s in-app game that encourages attendees to explore all the conference has to offer. Join the game to complete challenges, earn points, and win prizes!
How do I play Midwest Quest?
1. Turn on Networking
You must opt in to networking to join the game. If you did not do so when you went through the login process, you can turn on networking features from the Settings menu:
|
|
2. Become a player
The game period runs during the live MVC. Once it opens, you’ll be able to join as a player.
|
|
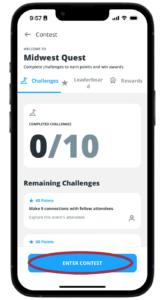
3. Complete Challenges
Points will be awarded automatically as you complete the challenges listed in the game. These are activities like participating in a session or special event, connecting with other attendees, and scanning Midwest Quest QR codes throughout the Exhibit Hall and other locations.
|
|
|

How do I participate in the Exhibitor Scavenger Hunt?
In the Contest section of the app, you will find a number of “Exhibit Hall Scavenger Hunt” challenges that list an exhibitor and their corresponding booth number. Find the exhibitor in the exhibit hall and use the QR Code scanner in the upper right corner of the MVC app to scan the Midwest Quest QR code at their booth to complete the challenge. Complete all Exhibitor Scavenger Hunt challenges to unlock a special badge!
I completed a challenge, but my points weren’t awarded.
This is likely because your internet connection is slow. (Convention Center wi-fi can be slow at times, depending on how many visitors are using it.) Your points will be added once internet access is restored.
Are there prizes?
Yes! Besides bragging rights and badges, the four top point earners will receive a $250 digital gift card!
In the event of a tie, winners will be randomly chosen, raffle style.
Speakers, Sponsors & Exhibitors
What can I learn about speakers?
Tap on a speaker’s name from within a session, open the Network section, or tap on “Speakers” under “Education & Events” in the side panel to learn about the MVC speakers. You can read their biography, see and go to their sessions, or tap the + icon to add them as a connection. (Note, not all speakers opt in to networking.)
What can I learn about sponsors?
Open the Network section or tap on “Sponsors” under “Networking & Social” in the side panel to view a list of our sponsors. Tap on their profile to learn more about them, locate their booth in the Exhibit Hall (if they are also an exhibitor), connect on social media, download documents and resources, and contact a representative directly within the app.
What can I learn about exhibitors?
Open the Network section or tap on “Exhibitor Directory” under “Networking & Social” in the side panel to view a list of our exhibitors. Tap on their profile to learn more about them, locate their booth in the Exhibit Hall, connect on social media, download documents and resources, and contact a representative directly within the app.
Maps & Navigation
Are there maps to help me get around MVC?
Yes! Open the upper left menu and tap “Map” in the “Education & Events” section to access interactive maps of the Exhibit Hall, the Greater Columbus Convention Center, and Hyatt Regency.
How do I find a specific session on the map?
|
|
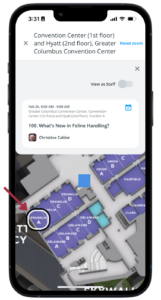
How do I locate a specific exhibitor in the exhibit hall?
There are two ways to locate an exhibitor in the exhibit hall:
- Tap to open/learn more about an exhibitor, then tap the booth number in its listing. The exhibit hall map will open showing you exactly where they are located.
- Open the Exhibit Hall map and tap any booth number to see which exhibitor is located there
Surveys
How can I rate the sessions I attend?
Open a session and tap the Survey icon underneath the title to rate the session and speaker and submit comments.
Rate at least three sessions to be entered in a drawing to win one of two $50 gift cards!
How can I take the overall MVC survey?
Tap the three horizontal lines in the top left corner of the screen, then tap on “MVC Evaluation” to complete the overall MVC survey. There will also be a response link in the post-MVC email.
Be sure to complete the survey by March 31. One respondent will win a $100 Amazon gift card!
Android OS and Apple icons by Icons8